Inductive Thinking with Visual Maps and Tools
Inductive, Deductive and Abductive Reasoning
Inductive Classification and Inductive Sequencing (Sequencing in Silence) Inductive reasoning moves from specific instances into a generalized conclusion (bottom up), while deductive reasoning moves from generalized principles that are known to be true to a true to provide direction with specific instances (top down). Abductive reasoning usually starts with an incomplete set of observations and proceeds to the likeliest possible explanation for the group of observations. We will focus on inductive and deductive reasoning.
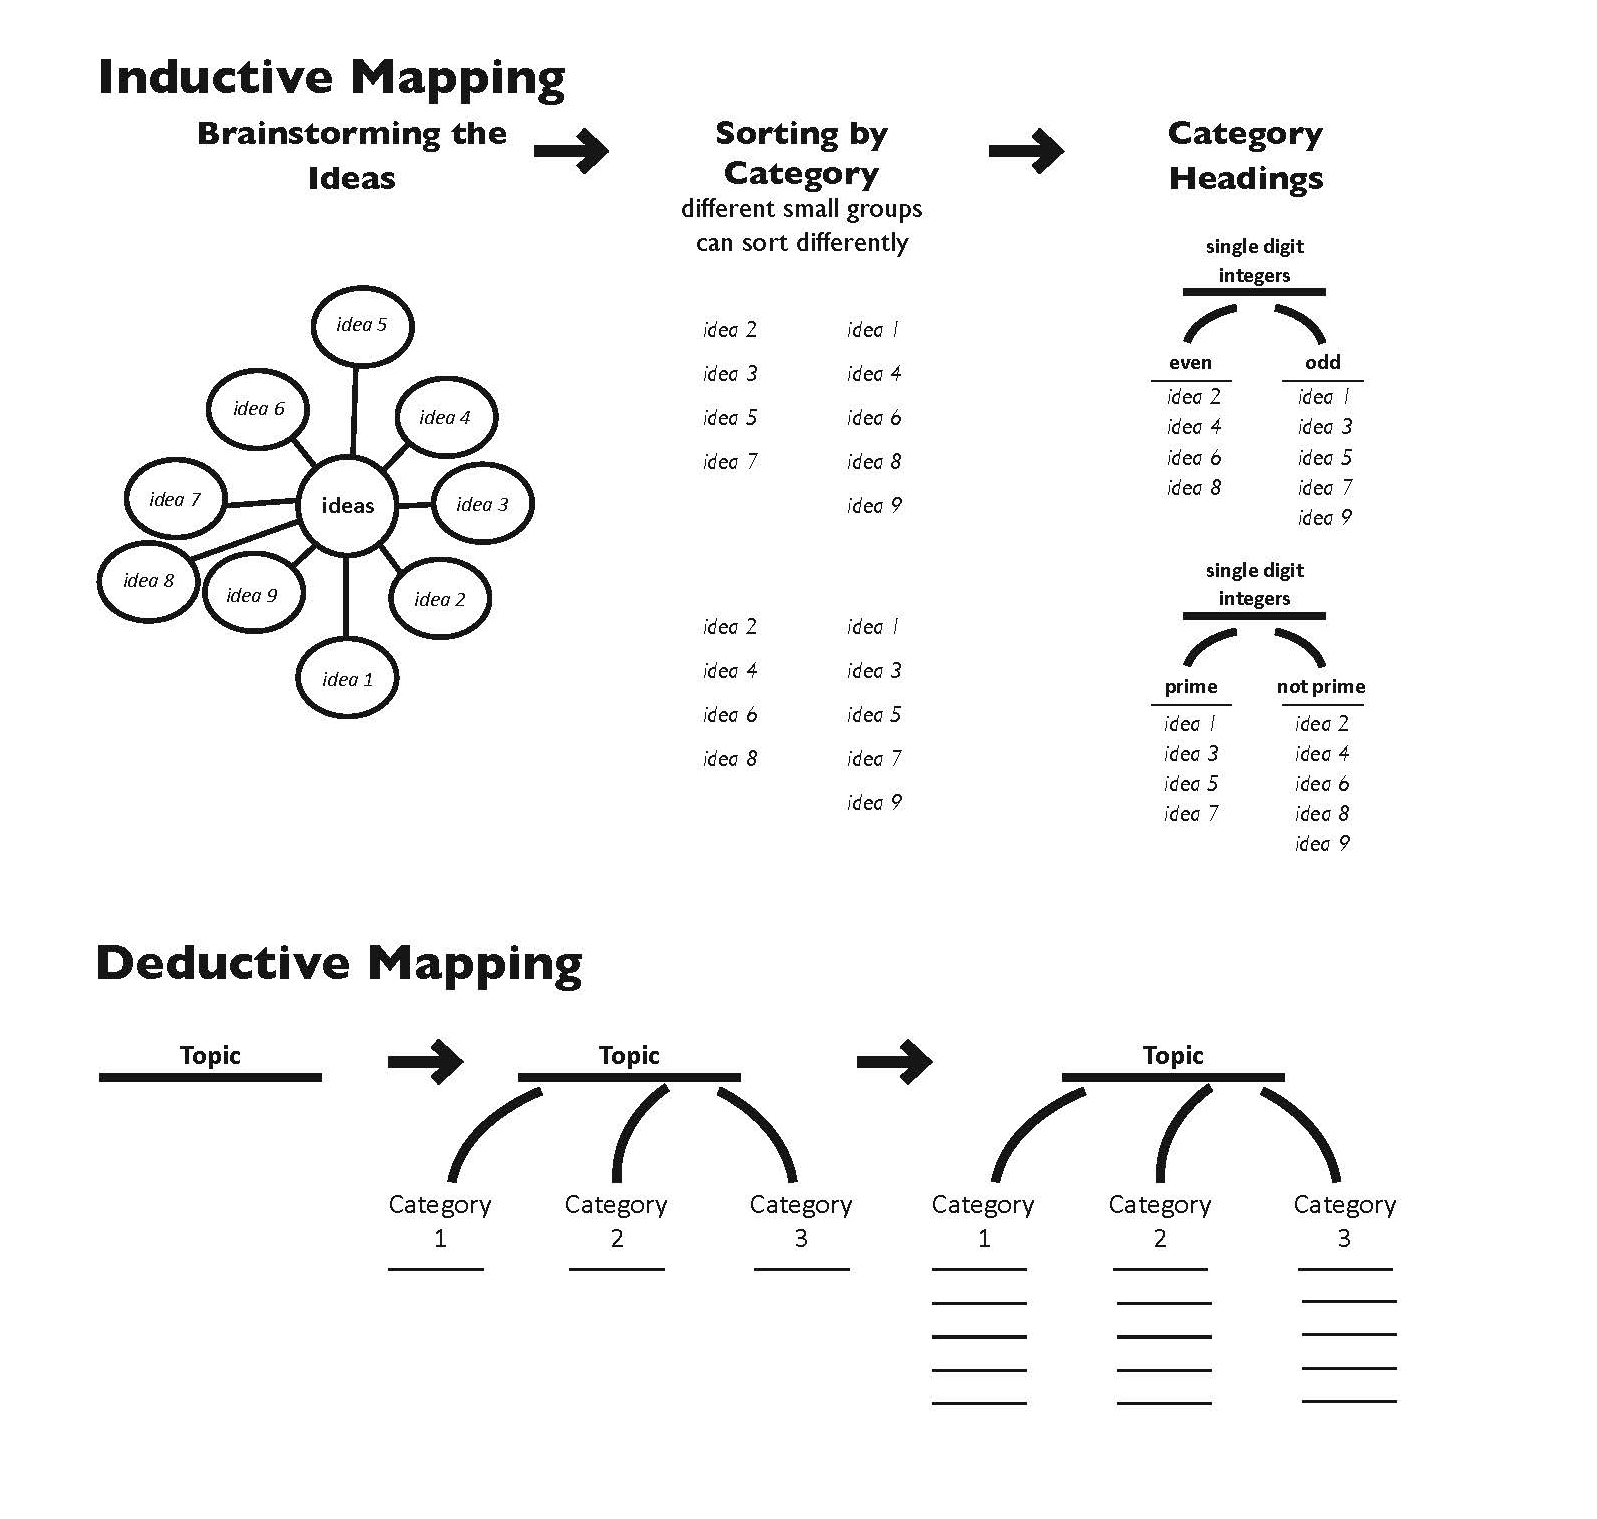
Inductive Classification Let’s keep it simple with an example. We will use a Tree Map for Classification to model. This map can be created ‘top down’ or ‘bottom up’:
• Top down requires starting with the top categories to sort the things and/or ideas
being categorized.
• Bottom up starts with the things and/or ideas being categorized being sorted into similar categories, then determining the top categories.
Both have a purpose:
• Doing it from ‘bottom up’ requires thinking what are the connections and patterns are of the things and/or ideas being categorized, and from that determining what the top categories are. In small groups this increases the level of discussion in regards to synthesizing information and comprehending connections.
• Doing it from the ‘top down’ begins with and follows a predetermined design and order to sort the different things and/or ideas to be categorized. This assumes everyone has the same frame for categorizing.
Inductive Classification Steps
- Pick a Topic
Have students write on separate pieces of paper different things about the topic they are studying. This can be in form of objects, ideas, parts of, questions, etc. In small groups (3-5 students) the students will then write several (4-6) different things. They then will put all their ‘things’ in one pile together (12-20). - Modeling
Gathering around one group in a fishbowl, the teacher with the group all are around will model as a team to make decisions with each thing if they are similar or different to create categorizations. - Groups in Action
All small groups will then inductively sort into categories their ‘things’. - Label the Categories
Each group will label the categories by title they have sorted the ‘things’ into. - Gallery Walk
The whole class will fishbowl around one group at at time to see how they categorized their ‘things’.
ALTERNATIVE: Each group stands and shares their top categories.
While the different processes are modeled on the opposite page for a Sorting for Classifications Map, this process is applicable for ALL visual maps, and all explorations of things and ideas.
Inductive Sequencing (Sequencing in Silence)
Implementing Sequencing in Silence – the Order of Events
All Grades K-12

1. The Process
The process takes approximately four to six minutes and will require us to work as a silent team. It is important for all participants be knowledgeable of the story, non-fiction selection, or event being used. If they are not familiar with the information they can observe.
The ‘silence’ is not essential, but does have everyone focus more. That said at kindergarten where this also is very effective, silence is less likely.
2. Draw an Action
The students are asked to draw an action from the fiction or non-fiction selection or event. The teacher can model drawing an action for further understanding (especially the first time with younger children) – important to model talk-out-loud thinking and the use of tools (markers or crayons). The students are then asked to draw an action from the story you think no one else will draw (very important phrasing) on a blank paper (also referred to as a panel). They are given 1-3 minutes to complete the drawing in silence. Everyone stops at the same time. The phrasing of draw an action from the story you think no one else will draw stimulates students to revisit the story in quest of an action they think others might not use.
3. Modeling (Teacher with Students)
Model the sequencing the action panels. The teacher with 2-3 students, each with a panel, will silently model the use of gestures and other methods of silent communication to create a sequential order of the panels. The teacher only talks out loud to introduce what the modeling will be. It is helpful to focus the students on observing a technique (e.g. gestures) you will be using.
4. Action
Sequence in Silence in small groups (5-12 students in each group). The first times should be smaller groups. For K-1 groups of 3-4 is recommended. The students are quickly divided into several groups and directed to a location for sequencing their panels. Floor space is excellent – provides excellent viewing for collaboration by all participants in the group. It is recommended to have all the panels in one line, even if some are similar.While some panels might have a similar action, the students will be able to reason why one panel proceeds another. This is excellent for inferences. The purpose of silence during this segment is to assist having everyone focused on the different panels instead of voice gridlock.
5. Gallery Walk
Gather around one of the small groups sequenced panels in a fishbowl format. Each panel is explained by the person who drew the action in order from beginning to end. For the first panel ask who drew it and request them to describe the action. Point to the next panel and ask who drew it and request them to describe that action. Point to the next panel and wait for the person to speak up. After the first group is finished, go to the next group and repeat the process (essentially a gallery walk). The goal is having the students, K-12, take the responsibility in the process. After the initial uses of Sequencing in Silence, the students will lead the process.
6. Each Group in the Gallery Walk
Questions about the sequence. The group is asked are there any changes they would like to make with the order of the sequence. If there is discussion about the positioning of panels, excellent. This creates a deeper understanding of what is being studied with Sequencing in Silence. If there are similar actions depicted in panels, they can discuss what is in each panel to determine the correct order.
Adding to the sequence.When the order of the initial panels have been decided upon, the students are then asked if they would like to add any missing actions. They are drawn on new panels and added to the sequence.
Sub-panels below each action panel. The students will dictate or write 2 or 3 things about each action panel. They will then sequence the group of sub-panels under each panel. After completing the sub-panels, the student(s) now have a sequence of events for the fiction or non-fiction selection or occurrence.
9. Causation with a Panel
Cause and Effect of a specific panel. Take any individual panel and create causes of that action on the left side and effects on the right side. To facilitate the process, the panel can be taped or pasted to a much larger paper, then writing to the left of the panel the causes of that action, and to the right the effects of that action.